
In my Last post i teach you guys to share files through lan cable today i am going to tell you a similar method for window 8 and it didn't need any lan cable.The idea of this method id creating Homegroup.
What's a homegroup?
A homegroup is a group of PCs on a home network
that can share devices (such as printers), and libraries (such as your
Documents, Pictures, Music, and Video libraries). Using a homegroup
makes sharing easier. Your homegroup is protected with a password, which
you can change at any time.
When you set up a PC with Windows 8, Windows RT, or Windows 7, a homegroup is created automatically. If a homegroup already exists on your home network, you can join it.
After you create or join a homegroup, you select
the libraries and devices that you want to share. You can prevent
specific files or folders from being shared, and you can share
additional libraries later. You can choose who can and can't edit your
shared files.
Create a homegroup
-
Open HomeGroup by swiping in from the right edge of the screen, tapping Settings (or if you're using a mouse, pointing to the upper-right corner of the screen, moving the mouse pointer down, and then clicking Settings), tapping or clicking Change PC settings, and then tapping or clicking HomeGroup.
-
Tap or click Create.
-
Select the libraries and devices you want to share with the homegroup.
Join a homegroup
After someone on your network creates a homegroup, the next step is to join it. You'll need the homegroup password, which you can get from any homegroup member. All user accounts except the Guest account will belong to the homegroup. Each person controls who can get to his or her own libraries.To join a homegroup, follow these steps on the PC that you want to add to the homegroup:-
Open HomeGroup by swiping in from the right edge of the screen, tapping Settings (or if you're using a mouse, pointing to the upper-right corner of the screen, moving the mouse pointer down, and then clicking Settings), tapping or clicking Change PC settings, and then tapping or clicking HomeGroup.
-
Enter the homegroup password, and then tap or click Join.
Note
-
If you don't see a space to enter a password, there might not be a homegroup available. Make sure that someone has created a homegroup, or you can create a homegroup yourself.
-
-
Select the libraries and devices you want to share with the homegroup.
-
Tap or click the control under Media devices if you want to allow devices on the network, such as TVs and game consoles, to play your shared content.
Share libraries and devices, or stop sharing them
When you create or join a homegroup, you select the libraries and devices you want to share with other people in the homegroup. Libraries are initially shared with Read access, which means that other people can look at or listen to what's in the library, but they can't change the files in it. You can adjust the level of access at any time, and you can exclude specific files and folders from sharing.Only those people who belong to the homegroup can see shared libraries and devices. You can choose to share libraries, devices, or individual files and folders with specific people in your homegroup or with everyone.Note
-
Keep in mind that children who use homegroup PCs can get to all shared libraries and devices.
To share devices and entire libraries
-
Open HomeGroup by swiping in from the right edge of the screen, tapping Settings (or if you're using a mouse, pointing to the upper-right corner of the screen, moving the mouse pointer down, and then clicking Settings), tapping or clicking Change PC settings, and then tapping or clicking HomeGroup.
-
Select the libraries and devices you want to share with the homegroup.
To share individual files or folders
-
Open File Explorer by swiping in from the right edge of the screen, tapping Search (or if you're using a mouse, pointing to the upper-right corner of the screen, moving the mouse pointer down, and then clicking Search), entering File Explorer in the search box, tapping or clicking Apps, and then tapping or clicking File Explorer.
-
Select the item, and then tap or click the Share tab.
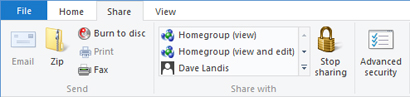
The Share tab -
Choose an option in the Share with group. There are different Share with options depending on whether your PC is connected to a network and what kind of network it is.
-
To share items with a particular person, choose that person's account.
-
To share with all the members of your homegroup, choose one of the Homegroup options. To select libraries to share with all the members of your homegroup, swipe in from the right edge of the screen, tap Settings, and then tap Change PC settings. (If you're using a mouse, point to the upper-right corner of the screen, move the mouse pointer down, click Settings, and then click Change PC settings.) Then tap or click HomeGroup.
-
To prevent a file or folder from being shared with anyone, tap or click the Share tab, and then tap or click Stop sharing.
-
To change the level of access to a file or folder, tap or click the Share tab, and then select either Homegroup (view) or Homegroup (view and edit).
-
If you need to share a location such as a drive or system folder, use the Advanced sharing option.
-
-
-
 You might be asked for an admin password or to confirm your choice.
No comments:
Post a Comment